Pi-hole, UDM Pro and Tailscale Setup
5 min read
I wanted to setup Pi-hole to experiment wit for a while and see what the hype is about. I do get really tired of ads especially on weather apps and recipe websites. I could do this install directly on my Unifi Dream Machine Pro but I prefer to keep experimental things separate so I added another Raspberry Pi to my rack dedicated to Pi-hole.
Raspberry Pi Setup
I setup a new Raspberry pi on the network with a POE hat to power it. I ordered the 4b with a preloaded SD card (because I felt lazy AF). I set it up in the rack with a little hack for the standoff since the rack mount for the Raspberry Pis takes up one of the screw locations for the POE hat’s standoff.
I created a ssh file in the root of the SD card per other documentation but was not able to ssh into the RPi after it booted. Upon reading further, I found that the newer OS Bullseye does not set a default username and password of pi:raspberry.
I had to create a userconf.txt file in the root of the SD card and add the user/pass I wanted with the password encrypted.
echo 'mygreatpassword' | openssl passwd -6 -stdinAfter boot I ssh’d into the RPi and got everything up to date before proceeding with Pi-hole installation
sudo apt update
sudo apt upgrade
I changed the hostname for the RPi to homelab-pihole, something more meaningful for my controller dashboard and Tailscale. I changed the hostname in the hosts file to match, then rebooted the RPi.
sudo hostnamectl set-hostname homelab-pihole
sudo nano /etc/hosts  # set localhost to homelab-pihole
sudo reboot
Pi-hole Install
Since this Raspberry Pi is dedicated to Pi-hole I used curl to install after setting the Raspberry pi to have a static IP address in the UDM controller. I didn’t see any reason to use a Docker install but you can do that.
curl -sSL https://install.pi-hole.net | bashI also went ahead and added the RPi to Tailscale since I plan on using that when we are not at home. curl -fsSL https://tailscale.com/install.sh | sh
To run tailscale with Pi-hole you have to start it with the flag --accept-dns to false.
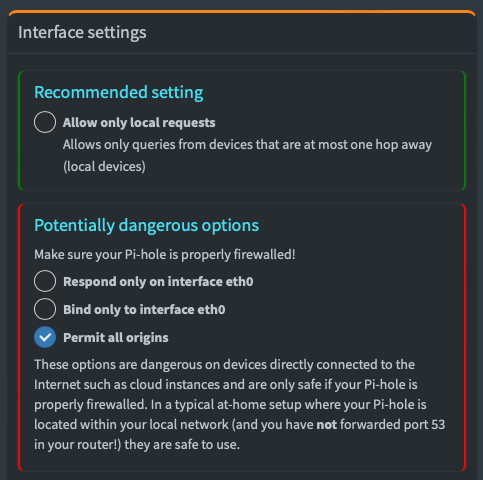
tailscale up --accept-dns=falseRequired Pi-Hole DNS settings
In the Pi-hole settings for DNS “permit all origins” has to be selected. This is a safe setting since firewall rules will be set on the UDM controller.
UDM Pro DNS Setup
The process for getting DNS setup for Pi-hole in the unifi controller was simple. Adding a profile and firewall rules then set the DNS to point to the Pi-hole IP.
Step 1 - Profiles
In the controller go to networks > settings > profiles and create a new profile under “IP Groups”
- I set the profile name to “DNS for port 53”
- Type Port Group
- Set the port to 53 and save the change
Step 2 - Firewall & Security
In networks > settings > firewall and security, I created two new firewall rules to control traffic (2000 and 2001 auto-assigned in my instance).
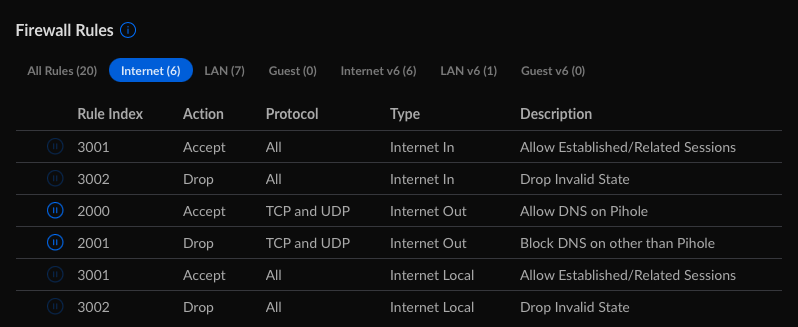
Configuration for rule 2000 - Allow DNS on Pi-hole
- I set the type to “Internet Out”
- Description “Allow DNS on Pi-hole”
- Rule applied “Before predefined rules”
- Action to “Accept”
- IPv4 Protocol to “TCP and UDP”
- Under source I set it to “IP Address” and set the IP to my Raspberry Pi’s IP address on the network.
- Under Destination I set it to the defaults for Port/IP Group
Configuration for rule 2001 - Block DNS on other than Pi-hole
- I set the type to “Internet Out”
- Description “Block DNS on other than Pi-hole”
- Rule applied “Before predefined rules”
- Action to “Drop”
- IPv4 Protocol to “TCP and UDP”
- Under source i set it to “Port/IP Group” and Any/Any
- Under destination I set it to “Port/IP Group” and under Port Group I selected the DNS for port 53 profile I created earlier
Setting the DNS for the network
Do this under the networks, NOT the WAN. In my case I only have one default network right now and a virtual network for my IoT devices. Note: since the virtual network I have setup for IoT devices inherits settings from the default network I do see some of my devices showing up in Pi-hole so I might change that later or not - time will tell if it’s a problem. I went to settings > networks > networks and selected my default network to enter the settings for the network.
Under “Advanced” I set it to manual. It was originally set to Auto. I selected to open the accordion for DHCP Service Management which is hidden by default. There is a setting for “DHCP DNS Server” which might be set to Auto. I unchecked auto and was presented with fields for DNS Servers. I input the IP address of my Raspberry Pi under “DNS server 1” and saved the network settings.
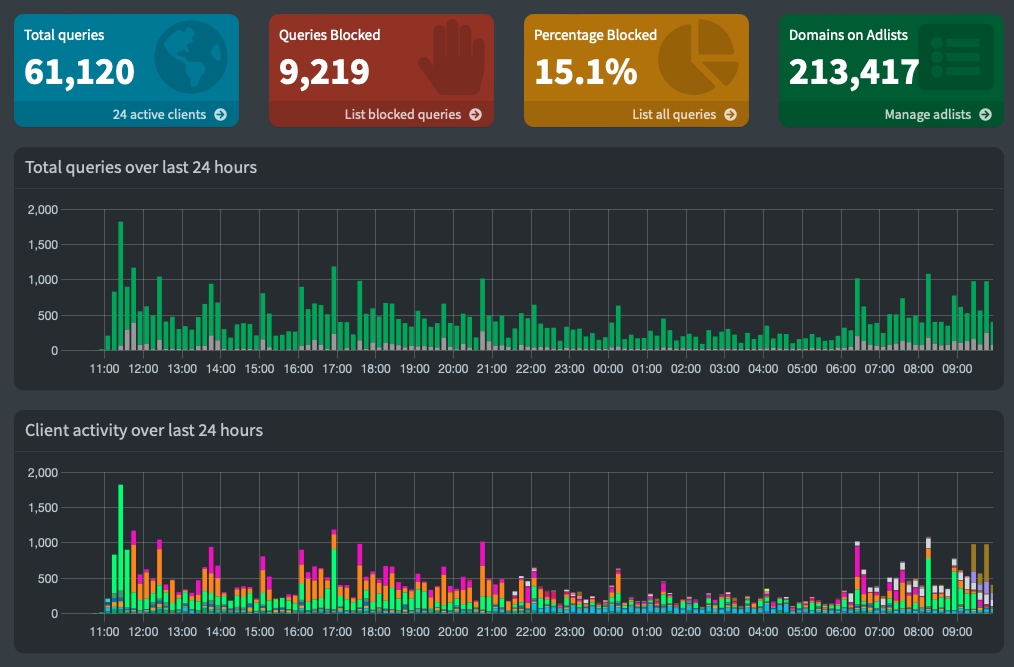
Testing it out
I had to drop my wifi on a few of my devices to renew the DHCP lease and saw in the Pi-hole admin that it was already starting to block ads on our network.
Tailscale - Access Pi-hole from anywhere
In Tailscale all I had to do was get the IP of homelab-pihole registered as a device in Tailscale and set that as the global nameserver. I had to toggle on “Override local DNS” since we want our network-wide DNS to override any local DNS settings the devices have. Easy to test, with Tailscale open on my phone, I shut of Wifi and opened up a weather app (one of the worst offenders) and had zero ads.
Apple Mail
I’ve been using Apple Mail recently on my iOS devices and my Mac. I noticed that images were being blocked in Apple Mail. Easy fix.
I ssh’d into the RPi and in /etc/pihole/pihole-FTL.conf added an entry to set BLOCK_ICLOUD_PR=false, which is set to true by default.